iPhone App「PhotoToolbox」
How to Use PhotoToolbox
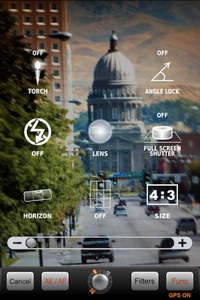
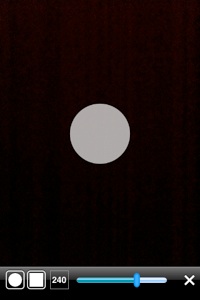
Photographic set-up on this screen.
Use your finger and vertically move, the camera will zoom in/out. Tap over a part of the scene, the app will set AE/AF lock.
Tap a few seconds, the app will unlock AE/AF. (Ver. 2.9.0 or later)

The indicator around the shutter shows upward/downward angle. When you hold iPhone vertically, the indicator is at 12 O’clock position.

The square indicator rotates in conjunction with the angle of iPhone. When you hold iPhone vertically, the square indicator turns to light yellow.

You can tap to focus and control exposure.
It is possible to change tap action, AE/AF, AF, AE or Full-Screen Shutter.

The filter you created is usable with photographic set-up. To apply the filter, tap center of the thumbnail image. Please read the Filter Screen section for how to create filter.
*Auto Save Mode is not available for the filtered photographic set-up.

To select a functions, tap this button.
Zoom Controller (6x), AngleLock, Horizontal Indicator on/off,
GridLines overlay, aspect ratio (1:1 / 7:6 / 4:3) mode switch,
Front/Rear camera switch(*), Flash on/off(*), Torch mode(*)
*iPhone4 or later

It is hard to get the right angle when you take a self-shot. This function helps you to incorporate yourself into the composition. Lock a designated angle so that iPhone takes a picture automatically when it gets the designated angle.
<How to Use>
-
(1)Capture your desired background, and then turn the angle
lock button on. iPhone vibrates once when it sets the
designated angle.
-
(2)Hold your iPhone directing its lens to you.
-
(3)Tilt iPhone slowly forwards or backwards.
Be sure to capture your designated background while
you move iPhone.
-
(4)When app detects the angle that you set, iPhone vibrates.
Please hold that angle. As soon as iPhone gets stable,
it takes a photo automatically.
Current settings indicator
[ GPS ON ] : When this indicator is displayed, Location Service is on. Geotagging needs to turn on the Location Service.
[ Auto Save ] : Auto Save Mode is on. (*)
*You can toggle the mode on the Settings screen.

When this indicator is displayed, Auto Save Mode is on. You can toggle the mode on the Settings screen. The green indicator shows the number of images taken, and the red indicator shows the number of images saved. Do not close the application until Auto Save is completed. You could load and edit a saved image from the Album, but the device may be overloaded by this operation. So this operation is not recommended.
Shooting Screen
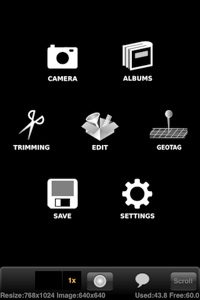
Home screen
Select your desired function on this screen.
This is the initial screen displayed at start-up.
If you selected Auto Start camera on the Settings screen, the Shooting screen is displayed as the initial screen.
The image you took, or selected from the Album is displayed on this screen.
To zoom in, double tap with one finger.
To zoom out, double tap with two fingers.

Go to the Shooting screen. Unsaved images will be deleted.

Go to the Album screen. Unsaved images will be deleted.

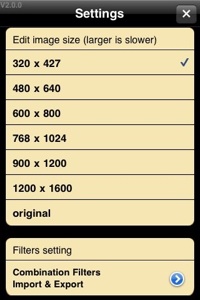
Resize your image on the Settings screen to edit, and then move to the Edit screen

Pixels of the resized image and the original image are displayed on the menu bar.

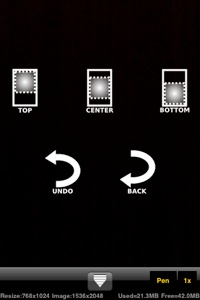
Crop an image to aspect ratio (1:1 / 7:6 /4:3).
By tapping this button, five buttons are displayed
Portrait image- crop top, center or bottom of the image
Landscape image - crop left, center or right of the image
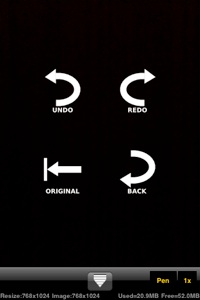
Undo by tapping the UNDO button.

Go to the Properties Screen. *This screen needs to turn on the Location Service.

To save your photos and retouched images, tap this button.
*Photos and edited images will not be overwritten due to OS specifications. File names cannot be changed.

Go to the Settings screen.
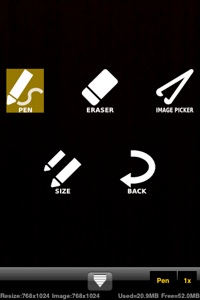
Editing Screen
You check on the image which applied a filter by this screen, and the modification is possible with a pen tool.
When you touch an image with one finger twice, the zoom in.
And when you touch an image with two fingers twice, the zoom out.

Go to the Filter screen.
Please read the Filter Screen section for more details.

You can execute REDO and UNDO up to 9 times. UNDO can be used to remove the filter to revert to the original image.

To use the Eraser and ImagePicker function, tap once.

Drag in a part of the image you want to draw effected image.

Drag in a part of the image you want to revert to the original state.

Drag the green-outlined area to your desired location to copy the area. Tap the screen once. When you see  this indicator, copy is done. Drag in a part of the image you paste the copy image.

To select the pen options, tap this button.
You can choose the shape (circle or square) and size of the pen tool.
*Pen tool cannot be used to edit 1024 pixels or larger photos to secure the application stability.
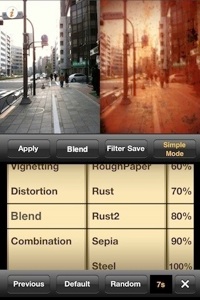
Filter Screen
Create your own filters.
Adjust Brightness, Contrast, Saturation, Hue, Color Equation (Yellow/Blue, Cyan/Red), Black and White, Mosaic/Blur(Soft Focus), Vignetting, Distortion, Blend and Gradation while you compare the original image and the retouched image side by side.
You can save the combination setting of the created filter.
Please see Combination section for more details.
Rotate the left cylinder to choose an effect.
Rotate the center cylinder to adjust +/- .
Rotate the right cylinder to choose a Gradation effect. (Ver. 2.3.0 or later)
(You can reproduce the gradation of 18 kinds with 2 colors that you choose.)
■Effects List
-Brightness : from -128 to +127 (*)
-Contrast : from -128 to +127 (*)
-Saturation : from -128 to +127 (*)
-Hue : from -128 to +127 (*)
-Luminance : from -128 to +127 (*)
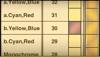
-1. Yellow / Blue (*):
from -1 to -127 = Yellow
from +1 to +127 = Blue
-1.Cyan / Red (*):
from -1 to -127 = Cyan
from +1 to +127 = Red
-2. Yellow / Blue (*):
from -1 to -127 = Yellow
from +1 to +127 = Blue
-2.Cyan / Red (*):
from -1 to -127 = Cyan
from +1 to +127 = Red
-Monochrome : ON / OFF
-Mosaic / Blur :
from -1 to -100 = Mosaic
from 1 to 10 = Blur
from 11 to 20 = Vignette Blur (Ver. 2.1.0 or later)
*Ver. 2.5.0 or later selectable blur a bright part and dark part.
-Vignetting :
from -1 to -50 = Vignette White (Ver. 2.1.0 or later)
from +1 to +205 = Vignette Black
*Ver. 2.4.0 or later selectable vignette shape.
-Distortion :
from -1 to -20 = FishEye(sphere)
from +1 to +10 = FishEye(rectangle)
*selectable with Gradation effect (Ver. 2.3.0 or later)
-Blend :
displaying your imported blend name
*Ver. 2.8.0 or later selectable Blend.

To apply the filter to the entire image, tap this button.
*Applying Soft Focus and Distortion may take long because of the large resolution.

Go to the Blend options screen. “Blend” is displayed on the cylinder.

Go to the Combination screen. “Combination” is displayed on the cylinder.

Go to the Simple Mode screen.

The latest filter setting is reappeared.

Set to zero for the effect displayed on the left side. If you tap again, all effects settings are set to zero.

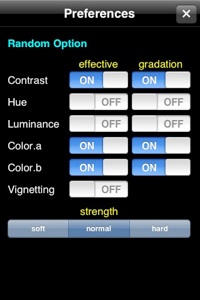
Contrast, Hue, Luminance, Color Equation (Yellow/Blue, Cyan/Red), Vignetting and Gradation setting are randomly chosen. You might find surprising effect on your image.
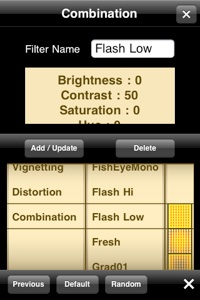
Combination screen
Register/update/delete the setting combinations of each filter.
You can name and save your own filters. Once saved, you can select your filters anytime from the filter cylinder. Some combinations are preloaded at the time of purchase, which are: Candle, Flash High/Low, High Contrast BW, Night Scope, Sepia and Toy Camera.

Name your filter in this field. When you select a filter on the cylinder, the filter name is displayed in this field too, which helps you when you update or delete an existing filter.
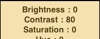
The current settings of each effect are displayed. Scroll here to see hidden settings.

Save the filter in the Filter Name field.

Delete the filter in the Filter Name field.
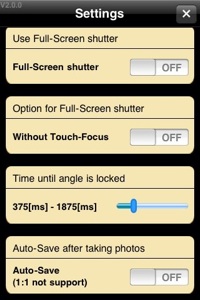
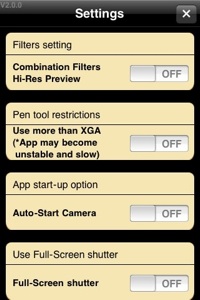
Setting Screen

Shutter after the angle fixation
Default Settings of the Preloaded Combination Filters:
[Flash Hi]
Brightness:0, contrast:90, Saturation:0, Hue:0,
Luminance:90, Yellow:0, Blue:0, Cyan:0, Red:0,
Monochrome:OFF, Mosaic:0, SoftFocus:0, vignetting:0
[HiContrastBW]
Brightness:0, contrast:70, Saturation:0, Hue:0,
Luminance:0, Yellow:0, Blue:0, Cyan:0, Red:0,
Monochrome:ON, Mosaic:0, SoftFocus:0, vignetting:50
[Sepia]
Brightness:0, contrast:0, Saturation:0, Hue:0,
Luminance:0, Yellow:10, Blue:0, Cyan:0, Red:10,
Monochrome:ON, Mosaic:0, SoftFocus:0, vignetting:0
[ToyCamera1]
Brightness:0, contrast:30, Saturation:0, Hue:0,
Luminance:0, Yellow:10, Blue:0, Cyan:10, Red:0,
Monochrome:OFF, Mosaic:0, SoftFocus:0, vignetting:80

[V2.9.0 combination filters export data]
Chocolate,0,40,0,0,-2080,-15,25,1,0,0,0,0,0,,0
Cinema,1020,10,-10,2,-45,-10,10,0,2004,0,0,0,0,,0
FishEye,0,15,20,0,1035,2025,-2020,0,0,1190,-14,1000,1005,Frame9,19000
Flash Hi,0,90,0,0,90,0,0,0,0,0,0,0,0,,0
Flash Low,0,50,0,0,60,0,0,0,0,0,0,0,0,,0
Fresh,-5,20,20,0,20,5,5,0,0,0,0,0,0,,0
Grad1,0,30,0,0,0,-12034,12012,0,0,0,0,11000,11036,,0
Grad2,0,30,0,0,0,12030,-12030,0,0,0,0,-11030,-11030,,0
Grad3,0,30,0,0,0,-11050,11040,0,0,0,0,-12030,-12030,,0
HiContrastBW,0,1070,0,0,0,0,0,1,0,1040,0,0,0,,0
HiContrastGreen,0,75,0,0,-2030,-18,-14,0,0,1040,0,0,0,,0
HiContrastOrange,0,75,0,0,-2030,-15,15,0,0,1040,0,0,0,,0
MistVignette,0,0,0,0,0,0,0,0,19,-1020,0,0,0,,0
Newspaper,0,-100,0,0,-20,-5,-10,1,0,20,0,0,0,SmallDots,37001
NightVision,0,90,0,0,90,20,-20,1,0,0,0,0,0,,0
Nostalgic,0,0,0,0,1015,-2020,-2020,0,0,2060,0,-45,30,,0
OldPaper,0,0,0,0,0,-24,8,1,0,55,0,0,0,OldPaper,19000
Sakura,-20,-10,0,0,60,-15,50,0,0,-2003,0,0,0,,0
Sepia1,0,0,0,0,0,-10,10,1,0,0,0,0,0,,0
Sepia2,0,30,0,0,0,26,20,1,0,45,0,0,0,Sepia,47000
SoftPink,-20,-25,15,0,1060,-5,20,0,1006,2020,0,0,0,,0
Sunrise,0,50,0,0,30,-60,30,0,0,0,0,0,0,,0
Temp.Cool,0,10,0,0,0,10,-10,0,0,0,0,0,0,,0
Temp.Warm,0,10,0,0,15,-15,10,0,0,0,0,0,0,,0
ToyCamera1,0,30,0,0,0,-10,-10,0,0,80,0,0,0,,0
ToyCamera2,0,0,0,-10,0,0,0,0,2,100,0,0,0,,0
ToyCamera3,0,30,0,0,0,-10,5,1,2,90,0,0,0,,0
ToyCamera4,0,30,0,0,20,0,0,0,2,2050,0,0,0,Steel,16000
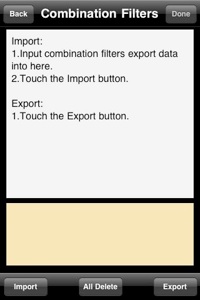
Combination Filters Import & Export Screen (Ver. 1.3.0 or later)
You can import & export your filter settings.
Tap the Export button, and then your filter settings are exported in CSV text format. You can save this text format in text files such as Notepad.
To import the filter to Combination Filters, paste the exported texts in Text Field and tap the Import button. If you already have the filter which has the same name, the data is not overwritten.
Image Size to Edit
If you want to resize the image to edit, choose desired size. You can choose “Original” if you don’t want to resize, but retouching process may cause CPU or memory overload if the image is too large to edit.
Combination Filter Import & Export (Ver. 1.3.0 or later)
Go to Combination Filters Import & Export screen.
Combination Filters High Resolution Preview (Ver. 1.3.0 or later)
You can preview the image at 4-as-high resolution. Please note that the processing may take longer because of memory overload.
Pen tool restrictions
Pen tool can be used more than XGA.
*App may become unstable and slow.
Auto-Start Camera
Shooting screen is displayed at start-up.
Full-Screen Shutter
The entire screen is functional as a shutter.
Without Touch-Focus
You can take a photo without Touch-Focus when you use the entire-screen shutter.
Time Interval for Angle Lock
Specify the time interval between Angle Lock and Shooting.
This is setting about Angle fixation button.
An angle of iPhone is stable and can specify time before pressing the shutter.
Auto Save
Images are saved automatically.
This option is not available for the filtered photographic set-up.

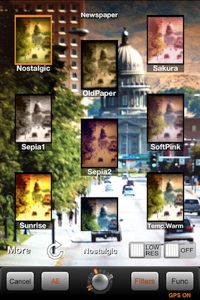
Thumbnail Preview Screen (Ver. 2.2.0 or later)
Preview your saved all filters on this screen.
If you select [Thumbnails] in Combination, it will be displayed.
To apply the filter to the entire image, tap center of the preview image.
When you turn on "Hi-Res Preview" in the Setting Screen, the generation of the preview image may take longer.

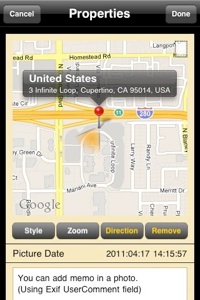
Properties Screen (Ver. 2.6.0 or later)
Geotagging on this screen.
*This screen needs to turn on the Location Service.
You drag the pin in the map, then the place can be changed.
This app links to Maps app from Ver2.6.1.
[ Style ] Button : To change map style
[ Zoom ] Button : To zoom map
[ Direction ] Button : To change direction
[ Remove ] Button : To remove geotag info
Picture Date
You can add memo in a photo.(Using Exif UserComment field)
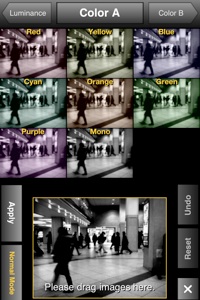
Simple Mode screen (Ver. 2.7.0 or later)
Easier to retouch.
You can choose an effect easier, with dragging upper thumbnail previews into the lower image.
< How to operate >
To choose the effect and to apply the image, drag upper thumbnail previews into the lower image.
To change the effects, flick the lower image from side to side.
To redraw thumbnail previews, flick down.
[ Undo ] Button
Back to the previous image.
[ Reset ] Button
Current value of the filter return to 0.
[ Apply ] Button
To apply the filter to the entire image, tap this button.
*Applying Soft Focus and Distortion may take long because of the large resolution.
[ Normal Mode ] Button
The screen is changed to Normal Mode.
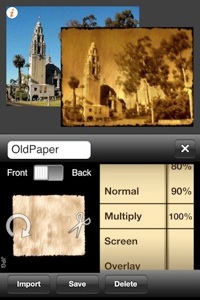
Blend Options screen (Ver. 2.8.0 or later)
Create your own Blend images.
Import the blend image made of JPG/PNG Format, and app can save it. You can choose the blend mode among 16 kinds.
Rotate the left cylinder to choose a blend mode.
Rotate the right cylinder to choose a blend ratio.
[ TextBox ] Blend Name Field
Name your blend image in this field.
[ Front / Back ] Switch
You choose the “Back”, to apply the filter to the blend image.
[ Rotate ] icon
You tap the this icon, to rotate the blend image.
[ Scissors ] icon
You tap the this icon, to trim the blend image.
[ Import ] Button
Import the blend image from Album folder.
[ Save ] Button
Save the blend image in the Blend Name field.
[ Delete ] Button
Delete the blend in the Blend Name field.
GridLines
4 : 3 , 7 : 6 1 : 1